> ## Content Index
> Fetch the complete content index at: https://www.hubwiz.com/blog/llms.txt
> Use this file to discover other available public pages before exploring further.
# AI驱动的Web抓取和数据分析
- URL: https://www.hubwiz.com/blog/ai-powered-web-scraping-and-data-analysis/
- Published: 2024-12-27T07:35:48.000Z
- Updated: 2024-12-27T07:38:38.000Z
- Description: 在本指南中,我们将学习如何将网页抓取与人工智能相结合,以构建一个强大的工具,用于免费大规模收集和分析数据。让我们开始吧!
- Author: admin
- Tags: APPLICATION, WEB SCRAPER, LLM, STREAMLIT, SELENIUM, BRIGHT DATA, #Import 2026-10-14 14:41
虽然某些网站只需使用 Selenium、Puppeteer 等工具即可轻松抓取,但实施了 CAPTCHA 和 IP 禁令等高级安全措施的其他网站可能会很困难。为了克服这些挑战并确保你可以使用 Scraper 免费抓取 99% 的网站,你将在本文中构建它,在代码中集成一个代理工具,以帮助绕过这些安全措施。
但是,收集数据只是其中一步;你对这些数据的处理同样重要,甚至更重要。通常,这需要手动仔细筛选大量信息。但是,如果你可以自动化这个过程呢?通过利用语言模型 (LLM),你不仅可以收集数据,还可以查询数据以提取有意义的见解——节省时间和精力。
在本指南中,我们将学习如何将网页抓取与人工智能相结合,以构建一个强大的工具,用于免费大规模收集和分析数据。让我们开始吧!
开始之前,请确保你具备以下条件:
- 基本 Python 知识,因为此项目涉及编写和理解 Python 代码。
- 在你的系统上安装 Python(3.7 或更高版本)。你可以从 python.org 下载。
## 1、安装和设置
要继续本教程,请完成以下步骤:
按照以下步骤设置您的环境并准备构建 AI 驱动的抓取工具。
### 1.1 创建虚拟环境
首先,设置虚拟环境来管理项目的依赖项。这将确保你拥有一个用于所有必需包的独立空间。
创建新项目目录。打开终端(或 Windows 上的命令提示符/PowerShell)并为您的项目创建一个新目录:
```
mkdir ai-website-scraper
cd ai-website-scraper
```
创建虚拟环境。运行以下命令创建虚拟环境。
```
python3 -m venv venv
```
这将创建一个用于存储虚拟环境的 venv 文件夹。
### 1.2 激活虚拟环境
激活虚拟环境以开始在其中工作:
```
source venv/bin/activate
```
你的终端提示符将更改为显示 (venv),确认你现在位于虚拟环境中。
### 1.3 安装所需的依赖项
现在,安装项目所需的库。在项目目录中创建一个 `requirements.txt` 文件并添加以下依赖项:
```
streamlit
selenium
Beautifulsoup4
langchain
langchain-ollama
lxml
html5lib
```
这些包对于抓取、数据处理和构建 UI 至关重要:
- streamlit:用于创建交互式用户界面。
- Selenium:用于抓取网站内容。
- beautifulsoup4:用于解析和清理 HTML。
- langchain 和 langchain-ollama:用于与 Ollama LLM 集成并处理文本。
- lxml 和 html5lib:用于高级 HTML 解析。
通过运行以下命令安装依赖项。在运行命令之前,请确保你位于文件所在的文件夹中:
```
pip install -r requirements.txt
```
## 2、使用 Streamlit 构建 UI
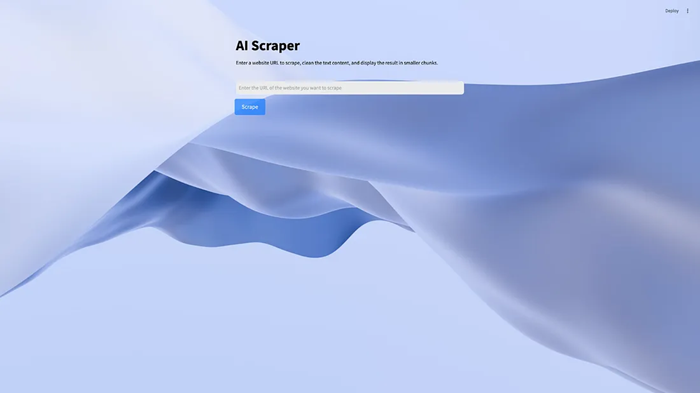
Streamlit 可轻松为 Python 应用程序创建交互式用户界面 (UI)。在本节中,你将构建一个简单、用户友好的界面,用户可以在其中输入 URL 并显示抓取的数据。
### 2.1 设置 Streamlit 脚本
在项目目录中创建一个名为 ui.py 的文件。此脚本将定义抓取工具的 UI。使用以下代码来构建你的应用程序:
```
import streamlit as st
import pathlib
from main import scrape_website
# function to load css from the assets folder
def load_css(file_path):
with open(file_path) as f:
st.html(f"")
# Load the external CSS
css_path = pathlib.Path("assets/style.css")
if css_path.exists():
load_css(css_path)
st.title("AI Scraper")
st.markdown(
"Enter a website URL to scrape, clean the text content, and display the result in smaller chunks."
)
url = st.text_input(label= "", placeholder="Enter the URL of the website you want to scrape")
if st.button("Scrape", key="scrape_button"):
st.write("scraping the website…")
result = scrape_website(url)
st.write("Scraping complete.")
st.write(result)
```
- st.title 和 st.markdown 函数设置应用程序标题并为用户提供说明。
- st.text\_input 组件允许用户输入他们想要抓取的网站的 URL。
- 单击“Scrape”按钮会触发抓取逻辑,使用 st.info 显示进度消息。
你可以从 streamlit 组件的[文档](https://docs.streamlit.io/?ref=hubwiz.com)中了解有关其的更多信息。
### 2.2 添加自定义样式
要设置应用程序的样式,请在项目目录中创建一个 assets 文件夹并添加一个 style.css 文件。使用 CSS 自定义 Streamlit 界面:
```
.stAppViewContainer {
background-image: url("https://images.unsplash.com/photo-1732979887702-40baea1c1ff6?q=80&w=2832&auto=format&fit=crop&ixlib=rb-4.0.3&ixid=M3wxMjA3fDB8MHxwaG90by1wYWdlfHx8fGVufDB8fHx8fA%3D%3D");
background-size: cover;
color: black;
}
.stAppHeader {
background-color: rgba(0, 0, 0, 0);
}
.st-ae {
background-color: rgba(233, 235, 234, 0.895);
}
.st-emotion-cache-ysk9xe {
color: black;
}
.st.info, .stAlert {
background-color: black;
}
.st-key-scrape_button button {
display: inline-block;
padding: 10px 20px;
font-size: 16px;
color: #fff;
background-color: #007bff;
border: none;
border-radius: 5px;
cursor: pointer;
animation: pulse 2s infinite;
}
.st-key-scrape_button button:hover {
background-color: #0056b3;
color: #fff;
}
```
### 2.3 运行 Streamlit 应用
在你的项目目录中,运行以下命令:
```
streamlit run ui.py
```
这将启动本地服务器,你应该在终端中看到一个 URL,通常是 `http://localhost:8501`。在浏览器中打开此 URL 以与 Web 应用程序交互。
## 3、使用 Selenium 抓取网站
接下来,编写代码以使用 Selenium 提取任何网页的 HTML 内容。但是,要使代码正常工作,你需要 Chrome WebDriver。
### 3.1 为 Selenium 安装 ChromeDriver
Selenium 需要 WebDriver 才能与网页交互。以下是设置方法:
- 下载 ChromeDriver。访问 ChromeDriver 网站并下载与您的 Google Chrome 浏览器匹配的版本。
- 将 ChromeDriver 添加到 PATH。
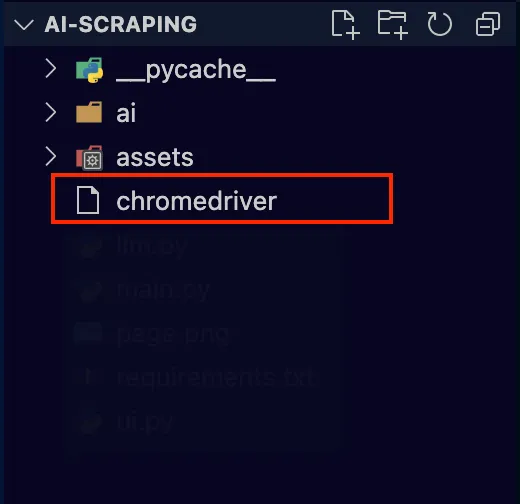
下载 ChromeDriver 后,解压文件并复制应用程序文件名“chromedriver”并将其粘贴到你的项目文件夹中。
完成后,创建一个名为 main.py 的新文件并执行以下代码:
```
from selenium import webdriver
from selenium.webdriver.common.by import By
from selenium.webdriver.chrome.service import Service
from selenium.webdriver.support.ui import WebDriverWait
from selenium.webdriver.support import expected_conditions as EC
# Function to scrape HTML from a website
def scrape_website(website_url):
# Path to WebDriver
webdriver_path = "./chromedriver" # Replace with your WebDriver path
service = Service(webdriver_path)
driver = webdriver.Chrome(service=service)
try:
# Open the website
driver.get(website_url)
# Wait for the page to fully load
WebDriverWait(driver, 10).until(EC.presence_of_element_located((By.TAG_NAME, "body")))
# Extract the HTML source
html_content = driver.page_source
return html_content
finally:
# Ensure the browser is closed after scraping
driver.quit()
```
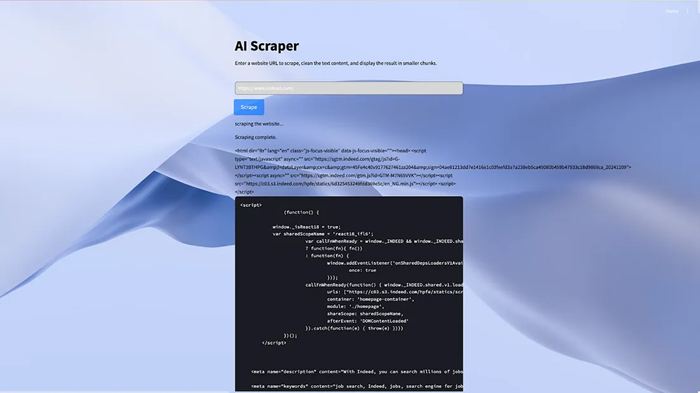
保存并运行代码;你应该会像这样在 streamlit 应用程序中显示抓取的页面的所有 HTML:
## 4、使用代理提供商绕过验证码和 IP 禁令
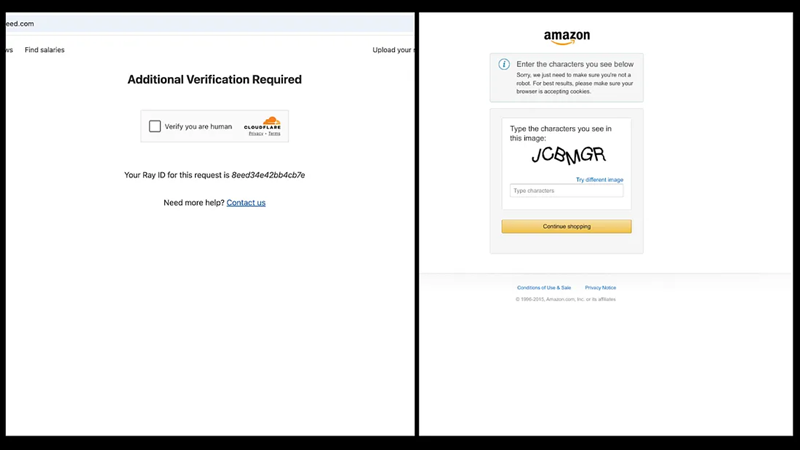
虽然你现在可以检索网站的 HTML,但上述代码可能不适用于具有高级反抓取机制(如验证码挑战或 IP 禁令)的网站。例如,使用 Selenium 抓取 Indeed 或 Amazon 等网站可能会导致验证码页面阻止访问。发生这种情况的原因是网站检测到机器人正在尝试访问其内容。如果这种行为持续存在,该网站最终可能会禁止你的 IP 地址,从而阻止进一步访问。
要解决此问题,请将 [Bright Data 的抓取浏览器](https://get.brightdata.com/bd-scraping-browser?ref=hubwiz.com)集成到你的脚本中。抓取浏览器是一款强大的工具,它利用多个代理网络(包括住宅 IP)来绕过反抓取防御。它通过管理自定义标头、浏览器指纹识别、验证码解决等来处理解锁页面。这可确保你的抓取工作在无缝访问内容的同时不被发现。
转到 Bright Data 的主页并单击“开始免费试用”。如果你已经拥有 Bright Data 帐户,则只需登录即可。
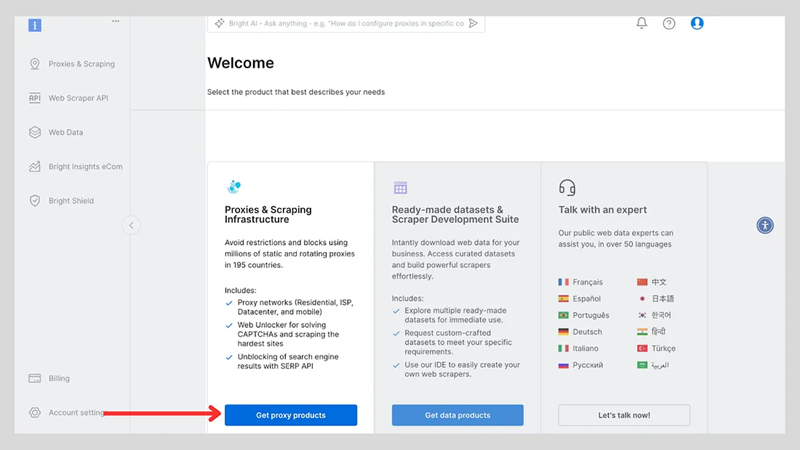
登录后,单击“获取代理产品”。
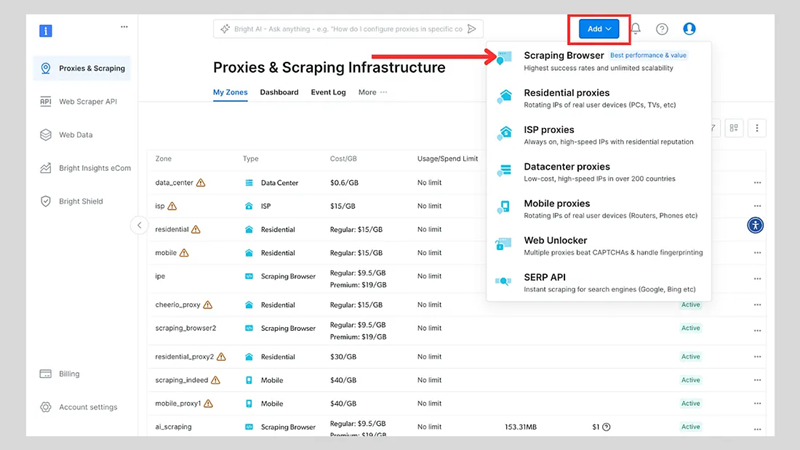
单击“添加”按钮并选择“抓取浏览器”。
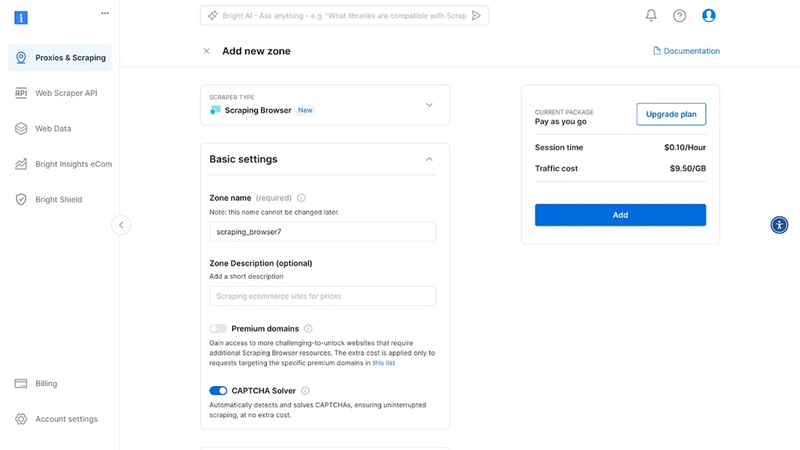
接下来,你将进入“添加区域”页面,需要在该页面为新的抓取浏览器代理区域选择一个名称。之后,单击“添加”。
之后,将创建你的代理区域凭据。你将需要脚本中的这些详细信息,以绕过任何网站上使用的任何反抓取机制。
你还可以查看 Bright Data 的[开发人员文档](https://get.brightdata.com/getting-started-with-scraping-browser?ref=hubwiz.com),了解有关抓取浏览器的更多详细信息。
在你的 main.py 文件中,修改代码以包含抓取浏览器。你会注意到此代码比以前的代码更简洁、更短。
```
from selenium.webdriver import Remote, ChromeOptions
from selenium.webdriver.chromium.remote_connection import ChromiumRemoteConnection
from selenium.webdriver.common.by import By
from bs4 import BeautifulSoup
AUTH = ':'
SBR_WEBDRIVER = f'@brd.superproxy.io:9515'">https://{AUTH}@brd.superproxy.io:9515'
# Function to scrape HTML from a website
def scrape_website(website_url):
print("Connecting to Scraping Browser…")
sbr_connection = ChromiumRemoteConnection(SBR_WEBDRIVER, "goog", "chrome")
with Remote(sbr_connection, options=ChromeOptions()) as driver:
driver.get(website_url)
print("Waiting captcha to solve…")
solve_res = driver.execute(
"executeCdpCommand",
{
"cmd": "Captcha.waitForSolve",
"params": {"detectTimeout": 10000},
},
)
print("Captcha solve status:", solve_res["value"]["status"])
print("Navigated! Scraping page content…")
html = driver.page_source
return html
```
将 `` 和 `` 替换为你的抓取浏览器用户名和密码。
## 5、清理 DOM 内容
抓取网站的 HTML 内容后,通常会充斥着不必要的元素,例如 JavaScript、CSS 样式或不需要的标签,这些元素对您提取的核心信息没有帮助。为了使数据更加结构化并更有利于进一步处理,您需要通过删除不相关的元素和组织文本来清理 DOM 内容。
本节介绍如何清理 HTML 内容、提取有意义的文本并将其拆分为较小的块以供下游处理。清理过程对于为自然语言处理或内容分析等任务准备数据至关重要。
以下是将添加到 main.py 中以处理清理 DOM 内容的代码:
```
from bs4 import BeautifulSoup
# Extract the body content from the HTML
def extract_body_content(html_content):
soup = BeautifulSoup(html_content, "html.parser")
body_content = soup.body
if body_content:
return str(body_content)
return ""
# Clean the body content by removing scripts, styles, and other unwanted elements
def clean_body_content(body_content):
soup = BeautifulSoup(body_content, "html.parser")
# Remove