> ## Content Index
> Fetch the complete content index at: https://www.hubwiz.com/blog/llms.txt
> Use this file to discover other available public pages before exploring further.
# 用Remotion构建AI生成视频
- URL: https://www.hubwiz.com/blog/building-ai-generated-video-with-remotion/
- Published: 2026-04-21T20:51:10.000Z
- Updated: 2026-10-13T15:06:06.000Z
- Description: 构建一个动态视频流水线,让 Claude 从类型化的组件目录中选择、排序并填充场景。
- Author: admin
- Tags: LIBRARY, REMOTION, #Import 2026-10-14 14:41
构建 AI 驱动的界面通常意味着解析模型输出、发明约定,以及编写胶水代码,而这些代码在模型改变主意的那一刻就会崩溃。JSON Render 通过给模型一个严格的契约来消除这些问题:一个你定义的组件目录,以及一个它必须输出的规格格式。模型选择使用哪些组件、以什么顺序、用什么内容。你的渲染器将输出直接映射到 UI。
第一部分介绍了使用 React 作为渲染目标的核心原语(schema、catalog、registry)。本文使用相同的架构与 Remotion 结合,构建 Code Roast:一个从任何公共 GitHub 仓库拉取真实数据并生成 Wrapped 风格吐槽视频的工具。AI 分析仓库并决定包含哪些场景、以什么顺序、内容来自它实际发现的东西。每个仓库都会得到不同的结果。
如果你想先了解完整的概念背景,[从第一部分开始](https://medium.com/@kenzic/stop-parsing-text-how-json-render-turns-model-output-into-ui-0cd01b59dfa9?ref=hubwiz.com)。如果你已经熟悉 json-render 模型并想看到它在视频中的应用,请继续阅读。
## 1、各个部分如何配合
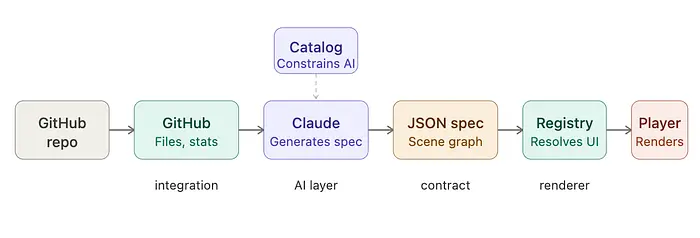
- **Catalog** — 定义 AI 允许生成哪些场景
- **Registry** — 将 catalog 条目映射到 Remotion 场景组件
- **API 路由** — 将 AI 生成的规格流式传输到客户端
- **Player** — 接收规格并渲染视频
## 2、设置
要跟随本指南,请在本地设置项目:
1. 克隆仓库:`git clone git@github.com:kenzic/code-roast-wrapped.git`
2. 安装依赖:`cd code-roast-wrapped && npm install`
3. 切换到 demo 分支:`git checkout -b demo origin/demo`
demo 分支已经集成了 GitHub、Remotion 场景组件和页面级连接。你将添加 catalog、registry 和 player 包装器。
## 3、GitHub 集成
打开 `./lib/github.ts`。它从仓库获取代码、提交统计、贡献者、语言和其他元数据(如所有者和描述)。这些数据直接传递给 Claude 作为生成吐槽的上下文。
## 4、构建 catalog
catalog 定义了哪些组件可用以及它们的 prop 类型。结合 schema,它是模型和前端之间的契约。
打开 `./lib/catalog.ts` 并将第一个组件添加到 `roastComponentDefinitions`。
```typescript
// object key name should match component name
RoastOpener: {
// The description is critical for helping the LLM understand when to use the component
description:
"Full-screen opener with repo + owner and a sharp roast tagline.",
// props with types gives the llm a clear understanding of what data it can provide the component.
props: z.object({
repoName: z.string(),
ownerName: z.string(),
tagline: z.string(),
}),
type: "scene",
defaultDuration: SCENE_DURATION_FRAMES,
},
```
这将 `RoastOpener` 定义为 AI 必须遵循的严格契约。它告诉模型这个组件是什么、何时使用、以及它可以输出哪些确切的 props。因为 catalog 是模型唯一被允许使用的词汇表,这个对象既指导生成,又通过将 AI 限制在类型化、已知的组件上来防止无效的 UI。
现在添加剩余的组件。最终的 catalog 应该如下所示:
```typescript
export const roastComponentDefinitions = {
RoastOpener: {
description:
"Full-screen opener with repo + owner and a sharp roast tagline.",
props: z.object({
repoName: z.string(),
ownerName: z.string(),
tagline: z.string(),
}),
type: "scene",
defaultDuration: SCENE_DURATION_FRAMES,
},
CrimeStat: {
description:
"A metric framed as a criminal offense with severity label for humor.",
props: z.object({
crime: z.string(),
stat: z.string(),
severity: z.enum(["misdemeanor", "felony", "capital offense"]),
}),
type: "scene",
defaultDuration: SCENE_DURATION_FRAMES,
},
ShameTimeline: {
description: "Highlights a suspicious commit timeline trend.",
props: z.object({
label: z.string(),
insight: z.string(),
}),
type: "scene",
defaultDuration: SCENE_DURATION_FRAMES,
},
HallOfFame: {
description: "One genuinely positive highlight to keep it friendly.",
props: z.object({
title: z.string(),
description: z.string(),
}),
type: "scene",
defaultDuration: SCENE_DURATION_FRAMES,
},
Verdict: {
description: "Final developer archetype and mock sentence.",
props: z.object({
archetype: z.string(),
description: z.string(),
sentence: z.string(),
}),
type: "scene",
defaultDuration: SCENE_DURATION_FRAMES,
},
};
```
调用 `defineCatalog` 来创建 catalog 对象。
```typescript
export const catalog = defineCatalog(schema, {
components: roastComponentDefinitions,
transitions: standardTransitionDefinitions,
effects: standardEffectDefinitions,
});
```
由于我们针对 Remotion,从 `@json-render/remotion` 导入 schema。
```typescript
// Note: this import is already in the file
import { schema } from "@json-render/remotion";
```
## 5、构建 registry
有了 catalog,registry 将 AI 生成的规格映射到实际的 UI 组件。每个键与 catalog 中的键匹配。当渲染器在规格中看到 `RoastOpener` 时,它调用相应的函数并传递 props。
打开 `./lib/registry.tsx`。
```tsx
/**
RoastOpener →
CrimeStat →
ShameTimeline →
HallOfFame →
Verdict →
*/
// When the render sees "RoastOpener" it invokes the function and passes the props from the spec
export const componentRegistry: ComponentRegistry = {
RoastOpener: ({ clip }) => (
),
CrimeStat: ({ clip }) => (
),
ShameTimeline: ({ clip }) => (
),
HallOfFame: ({ clip }) => (
),
Verdict: ({ clip }) => ,
};
```
## 6、连接 player
`WrappedPlayer` 是一个薄包装器,将你的时间线规格连接到 Remotion 的 `Player`。不是硬编码合成设置,而是直接从规格中读取 duration、fps 和 dimensions。无论模型生成什么,player 都会反映它。`@json-render/remotion` 的 `Renderer` 在运行时处理繁重的工作,使用 `componentRegistry` 解析动态引用,将规格的场景图转换为 React 组件。
添加到 `./components/wrapped-player.tsx`:
```tsx
/** Renders a timeline spec with Remotion Player and @json-render/remotion Renderer. */
// WrappedPlayer is a React component that takes a single prop 'spec' of type TimelineSpec
export const WrappedPlayer = ({ spec }: { spec: TimelineSpec }) => {
// Check if the 'composition' property exists on the 'spec' object
if (!spec.composition) {
// If there is no 'composition', render nothing (null)
return null;
}
// If 'composition' exists, render the Remotion Player component
return (
<>
);
};
```
一旦 player 有了规格,它就会处理其余部分。duration、fps、dimensions 和播放都派生自模型生成的内容。你可以[在这里查看示例规格](https://gist.github.com/kenzic/3be12bd94edc6b855d473a74fb094020?ref=hubwiz.com)。
## 7、Prompt
GitHub 集成提供数据。JSON Render 设置定义模型可以使用的组件。Prompt 是视频成形的地方。当提交仓库链接时,API 获取 GitHub 数据,`catalog.prompt()`(位于 `./lib/catalog.ts`)构建一个结构化 prompt,告诉模型哪些场景组件可用,并指示它根据在仓库中发现的内容选择、排序和填充它们。
## 8、运行
启动开发服务器:
`npm run dev`
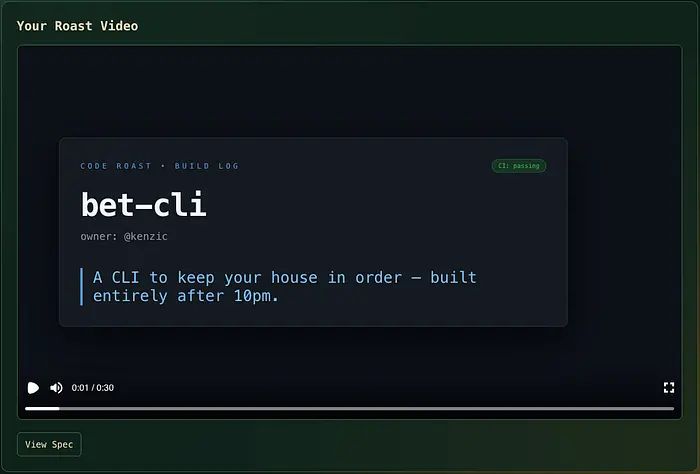
输入任何公共 GitHub 仓库。例如,`https://github.com/kenzic/bet-cli`。应用获取仓库数据,发送给 Claude,并将结果渲染为视频。每个仓库根据模型发现的内容产生不同的场景序列。
## 9、结束语
Code Roast 之所以有效,是因为 AI 不是在填充模板。它在选择展示什么。每个仓库得到不同的场景序列,因为模型决定哪些组件适合、以什么顺序、用什么内容。
JSON Render 不会改变你编写 React 或 Remotion 渲染视频的方式。它改变的是驱动它的东西。catalog 是你的约束层:模型只能输出你定义的内容。registry 是你的映射层:无论模型输出什么,player 都知道如何渲染。在中间,AI 决定视频中实际应该包含什么。
这就是实践中"[UI as a function of AI](https://medium.com/@kenzic/ui-as-a-function-of-ai-08755ed43816?ref=hubwiz.com)"的样子。不是一个聊天机器人 bolted 到静态页面上。而是一个流水线,其中模型的输出就是界面状态。
AI 辅助 UI 和 AI 驱动 UI 之间的差距不是设计哲学。而是架构决策。这是一种实现方式。
---
原文链接: [Building AI-Generated Video with JSON Render and Remotion](https://medium.com/@kenzic/building-ai-generated-video-with-json-render-and-remotion-b9f1000ff7af?ref=hubwiz.com)
汇智网翻译整理,转载请标明出处
> **这是「多模态生成」专题的一部分。**完整地图见:[多模态生成完全指南](https://www.hubwiz.com/blog/generative-media-stack/)