Nano Banana开发者指南
在这篇文章中,我将向您展示如何利用Nano Banana开发你的应用程序——从零设置到生成您的第一张 AI 猫咪照片。
Google 为我们开发者带来了一款新工具:Gemini 2.5 Flash 图像。
代号?Nano Banana。没错,他们就是这么叫的。
别被这个傻乎乎的名字迷惑了——它实际上是最强大的图像模型之一。
你可以完成所有常见的文本转图像操作,但它的功能更进一步:照片修复、多幅输入图像、分步对话编辑,甚至可以通过几个快速提示拼接出各种奇特的场景。你可以把它想象成一个带点魔法的 Photoshop。
在这篇文章中,我将向您展示如何入门——从零设置到生成您的第一张 AI 猫咪照片。
1、入门
在编写任何代码之前,测试 Nano Banana 最简单的方法是使用 Google AI Studio。您只需使用您的 Google 帐户登录,从模型列表中选择 Nano Banana,然后向其输入一些提示即可。
想要快捷方式?这是直接链接。
专业提示:AI Studio 还有一个名为“应用”的部分,您可以在其中混合小型项目。如果您想查看其他人正在构建的内容,这将非常方便。
2、设置你的项目
好吧,如果你想用代码真正构建一些东西,你需要三样东西:
- AI Studio 的 API 密钥
- 在 Google Cloud 中启用计费
- Gen AI SDK(Python 或 JS)
3、获取 API 密钥
- 前往 AI Studio → 获取 API 密钥 → 创建密钥
- 选择一个 Google Cloud 项目(或创建一个新项目)
- 复制你闪亮的新密钥并将其保存在安全的地方
4、计费
在 AI Studio 中进行测试是免费的,但 API 调用会花费一些钱。每张生成的图片大约需要 0.039 美元(也就是说,1 美元可以生成 25 张图片)。考虑到它的功能,这个价格还算不错。
5、安装 SDK
Python:
pip install -U google-genai
pip install Pillow
JavaScript:
npm install @google/genai在本教程的剩余部分,我将坚持使用 Python,但 JS SDK 也同样适用。
6、生成图片
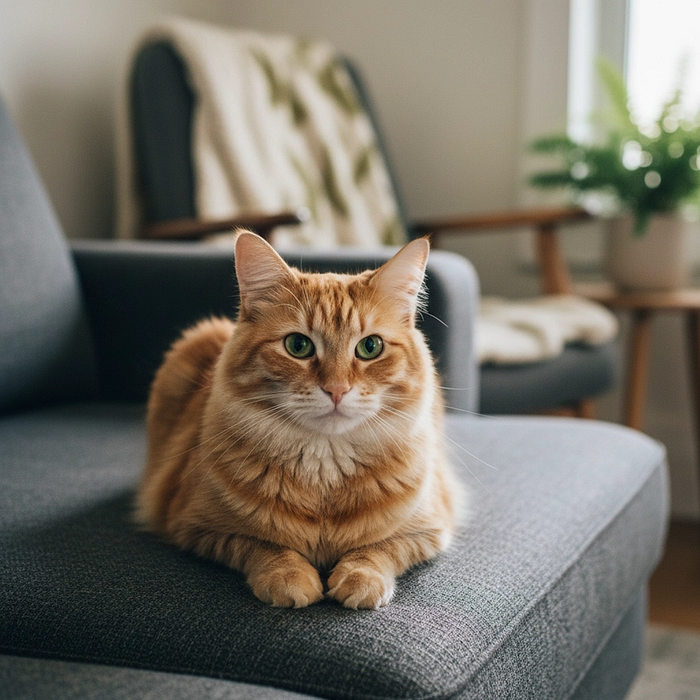
我们来画一只猫吧。何乐而不为呢?
from google import genai
from PIL import Image
from io import BytesIO

# Configure the client with your API key
client = genai.Client(api_key="YOUR_API_KEY")

prompt = """Create a photorealistic image of an orange cat
with a green eyes, sitting on a couch."""

# Call the API to generate content
response = client.models.generate_content(
    model="gemini-2.5-flash-image-preview",
    contents=prompt,
)

# The response can contain both text and image data.
# Iterate through the parts to find and save the image.
for part in response.candidates[0].content.parts:
    if part.text is not None:
        print(part.text)
    elif part.inline_data is not None:
        image = Image.open(BytesIO(part.inline_data.data))
        image.save("cat.png")
运行该程序,轰隆隆——你的文件夹中就有了 cat.png 文件。
7、使用提示编辑图片
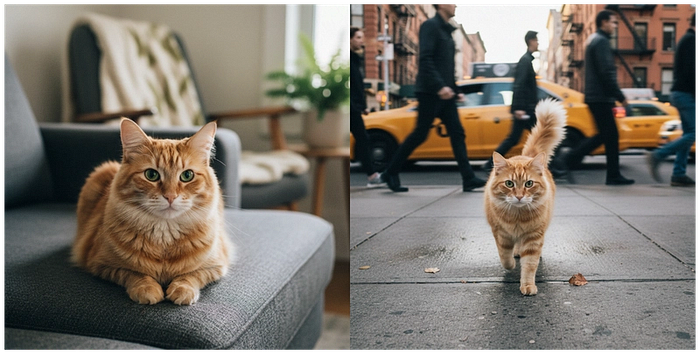
现在,让我们把同一只猫搬到纽约。
from google import genai
from PIL import Image
from io import BytesIO

client = genai.Client(api_key="YOUR_API_KEY")

prompt = """Using the image of the cat, create a photorealistic,
street-level view of the cat walking along a sidewalk in a
New York City neighborhood, with the blurred legs of pedestrians
and yellow cabs passing by in the background."""

image = Image.open("cat.png")

# Pass both the text prompt and the image in the 'contents' list
response = client.models.generate_content(
    model="gemini-2.5-flash-image-preview",
    contents=[prompt, image],
)

for part in response.candidates[0].content.parts:
    if part.text is not None:
        print(part.text)
    elif part.inline_data is not None:
        image = Image.open(BytesIO(part.inline_data.data))
        image.save("cat2.png")
Nano Banana 非常擅长保留“同一只”猫,只需将其移动到新场景即可。
8、修复旧照片
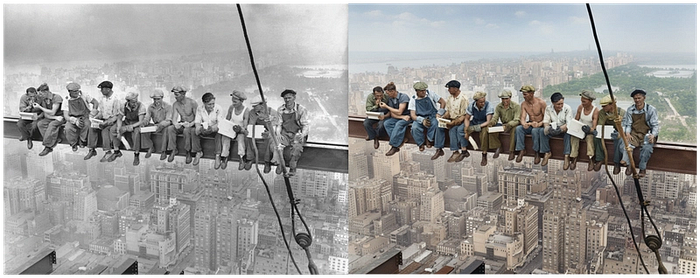
这部分给我留下了最深刻的印象。你可以把一张旧的黑白照片扔给它,然后只需说“修复并着色”。
from google import genai
from PIL import Image
from io import BytesIO

client = genai.Client(api_key="YOUR_API_KEY")

prompt = "Restore and colorize this image from 1932"

image = Image.open("lunch.jpg")  # "Lunch atop a Skyscraper, 1932"

response = client.models.generate_content(
    model="gemini-2.5-flash-image-preview",
    contents=[prompt, image],
)

for part in response.candidates[0].content.parts:
    if part.text is not None:
        print(part.text)
    elif part.inline_data is not None:
        image = Image.open(BytesIO(part.inline_data.data))
        image.save("lunch-restored.png")
它不仅仅是随机添加颜色——它实际上尝试匹配真实的色调。
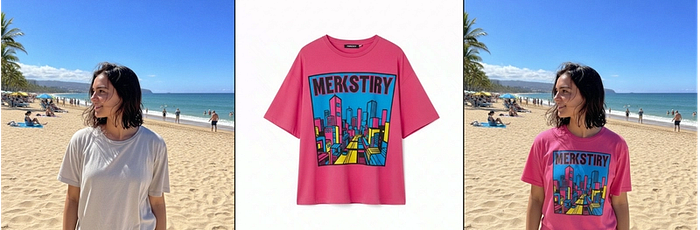
9、使用多张图片
想合并两张照片吗?很简单。
from google import genai
from PIL import Image
from io import BytesIO

client = genai.Client(api_key="YOUR_API_KEY")

prompt = "Make the girl wear this t-shirt. Leave the background unchanged."

image1 = Image.open("girl.png")
image2 = Image.open("tshirt.png")

response = client.models.generate_content(
    model="gemini-2.5-flash-image-preview",
    contents=[prompt, image1, image2],
)

for part in response.candidates[0].content.parts:
    if part.text is not None:
        print(part.text)
    elif part.inline_data is not None:
        image = Image.open(BytesIO(part.inline_data.data))
        image.save("girl-with-tshirt.png")
这种工作流程通常需要 Photoshop 和专业的设计师才能完成。这里只需要一个函数调用。
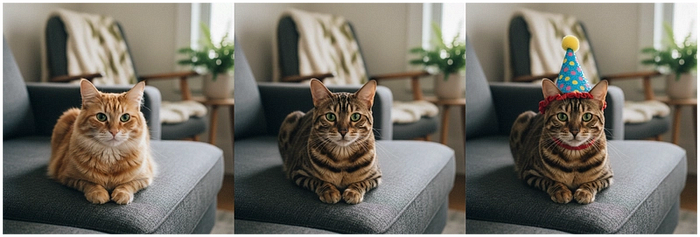
10、对话编辑
如果您使用聊天会话,Nano Banana 可以记住上下文。这意味着您无需每次都重写整个提示。
from google import genai
from PIL import Image
from io import BytesIO

client = genai.Client(api_key="YOUR_API_KEY")

# Create a chat
chat = client.chats.create(
    model="gemini-2.5-flash-image-preview"
)

# Make the first image edit
response1 = chat.send_message(
    [
        "Change the cat to a bengal cat, leave everything else the same",
        Image.open("cat.png"),
    ]
)
# display / save image...

# Continue chatting and editing
response2 = chat.send_message("The cat should wear a funny party hat")
# display / save image...
你可以一步一步地继续调整,感觉很自然。
11、提示技巧
以下是我最有效的方法:
- 要具体。不要只说“狗”。可以这么说:“一只金毛猎犬幼犬在草地上奔跑,清晨的阳光。”
- 添加背景信息。如果你想把它用作书籍封面,不妨提一下——这会改变氛围。
- 不断迭代。第一个提示并不总是完美的。要循序渐进。
- 保持积极的态度。不要说“没有车”,而要说“空荡荡的街道”。
- 像摄影师一样思考。广角、微距、弱光——这些都能用上。
12、其他人正在构建什么
我看到的一些很酷的东西:
- 地图变成了 3D 图形
- 火柴人涂鸦变成了成品艺术品
- 跨多个场景的一致角色
- 修复后在社交媒体上分享的家庭照片
虽然还处于早期阶段,但人们已经在朝着有趣的方向发展。
原文链接:How to Build with Nano Banana: A Complete Developer Guide for Gemini 2.5 Flash Image
汇智网翻译整理,转载请标明出处
