用AI将任意CLI转Web UI
CLI是界面。Web表单是界面。它们包含相同的信息,只是呈现方式不同。

微信 ezpoda免费咨询:AI编程 | AI模型微调| AI私有化部署
AI工具导航 | Tripo 3D | Meshy AI | ElevenLabs | KlingAI | ArtSpace | Phot.AI | InVideo
我已经花了三天时间为我们的内部CLI工具构建一个Web包装器。自定义React表单,手工将每个标志映射到输入字段,费力地编写验证逻辑。然后我看第一百次--help输出时,我的大脑短路了。
帮助文本本身就是一个表单规范。每个标志都是一个输入字段。每个描述都是一个标签。每个默认值都是一个占位符。每个类型约束都是一个验证器。这种直接的方法展示了AI如何简化UI创建,使其更易于访问且不那么令人生畏。
于是我把--help输出输入给Claude并请求一个Web UI。它给了我一个比我手工构建的更好的UI。大约8秒钟,展示了AI如何显著减少工作量并激发对自动化的信心。
1、没有人谈论的洞察
CLI是界面。Web表单是界面。它们包含相同的信息,只是呈现方式不同。--port INTEGER标志和<input type="number">字段是穿着不同衣服的同一个东西。
--help文本呢?它基本上是一种描述表单的DSL。它比我收到的一半Figma规范更有结构性。
2、这个脚本
这就是整个脚本。它获取CLI二进制文件,捕获其帮助输出,输入给Claude,并编写一个完整的HTML文件。一个脚本。没有框架。没有构建步骤。
#!/usr/bin/env python3
"""
cli2ui.py — 通过读取--help输出来将任何CLI转换为Web UI。
用法: python cli2ui.py <binary> [subcommand] -o output.html
"""

import subprocess
import re
import argparse
from pathlib import Path
from dotenv import load_dotenv
from anthropic import Anthropic

load_dotenv()

client = Anthropic()

GENERATION_PROMPT = """你是一个UI生成器。给定CLI工具的--help输出,生成一个完整的、
自包含的HTML文件,其中包含嵌入式CSS和JavaScript,为该CLI提供Web界面。

规则:
1. 每个标志/选项变成一个表单字段:
   - 字符串标志 → 文本输入
   - 布尔标志 → 复选框
   - 整数/浮点标志 → 数字输入
   - 有固定选项集的标志 → 下拉选择
   - 文件路径标志 → 带有"浏览"标签提示的文本输入
2. 每个描述变成标签/帮助文本
3. 每个默认值变成占位符或预填充值
4. 必需标志获得红色星号
5. 如果有超过10个标志,将相关标志分组到可折叠部分
6. 在底部包含一个实时"命令预览"面板,显示随着用户填写字段正在构建的确切CLI命令
7. 包含一个"执行"按钮(连接到POST /execute端点占位符)
8. 包含深色/浅色模式切换
9. 让它看起来干净现代——使用CSS网格、微妙阴影、良好的排版
10. HTML必须是100%自包含的(没有外部CDN链接)

这是--help输出:
{help_text}
二进制文件名为: {binary_name}

只生成HTML文件内容。不要Markdown围栏。不要解释。"""

def capture_help(binary: str, subcommand: str = None) -> str:
    """从CLI工具捕获--help输出。"""
    cmd = [binary]
    if subcommand:
        cmd.append(subcommand)
    cmd.append("--help")

    result = subprocess.run(cmd, capture_output=True, text=True, timeout=10)
    output = result.stdout or result.stderr  # 一些工具将帮助信息打印到stderr
    if not output.strip():
        raise RuntimeError(f"没有来自: {' '.join(cmd)} 的帮助输出")
    return output

def extract_subcommand_names(help_text: str) -> list:
    """从--help输出中提取子命令名称。

    查找常见模式,如:
    Commands:
      get      Get resources
      describe Show details
    """
    names = []
    in_section = False

    for line in help_text.split("\n"):
        lower = line.lower().strip()
        # 检测命令部分
        if any(kw in lower for kw in ["commands:", "available commands", "subcommands:"]):
            in_section = True
            continue
        if in_section:
            if not line.strip():
                # 空行可能结束部分,也可能不——继续
                continue
            if line[0] not in (" ", "\t"):
                # 非缩进行 = 部分结束
                in_section = False
                continue
            match = re.match(r"\s+(\w[\w-]*)", line)
            if match:
                names.append(match.group(1))

    return names

def capture_subcommands(binary: str) -> dict:
    """递归地为所有子命令捕获--help。"""
    help_tree = {}
    root_help = capture_help(binary)
    help_tree["__root__"] = root_help

    # 简单但有效: 查找看起来像子命令列表的行
    lines = root_help.split("\n")
    in_commands_section = False
    for line in lines:
        stripped = line.strip()
        if any(header in stripped.lower() for header in ["commands:", "available commands", "subcommands:"]):
            in_commands_section = True
            continue
        if in_commands_section:
            if not stripped or stripped.startswith("-"):
                in_commands_section = False
                continue
            # 行上的第一个词可能是子命令名称
            parts = stripped.split()
            if parts and not parts[0].startswith("-"):
                subcmd = parts[0]
                try:
                    help_tree[subcmd] = capture_help(binary, subcmd)
                except Exception:
                    pass  # 帮助文本中的一些"子命令"不是真正的子命令

    return help_tree

def deep_crawl_help(binary: str, prefix: list = None, depth: int = 0, max_depth: int = 3) -> dict:
    """递归爬取子命令帮助文本,最多max_depth层。"""
    if prefix is None:
        prefix = []
    if depth > max_depth:
        return {}

    cmd = [binary] + prefix + ["--help"]
    try:
        result = subprocess.run(cmd, capture_output=True, text=True, timeout=10)
        help_text = result.stdout or result.stderr
    except Exception:
        return {}

    tree = {}
    key = " ".join(prefix) if prefix else "__root__"
    tree[key] = help_text

    # 从帮助文本中提取子命令
    subcommands = extract_subcommand_names(help_text)
    for sub in subcommands:
        subtree = deep_crawl_help(binary, prefix + [sub], depth + 1, max_depth)
        tree.update(subtree)

    return tree

def generate_ui(binary: str, help_text: str) -> str:
    """将--help输入给Claude,返回完整的HTML UI。"""
    message = client.messages.create(
        model="claude-sonnet-4-20250514",
        max_tokens=8000,
        messages=[
            {
                "role": "user",
                "content": GENERATION_PROMPT.format(
                    help_text=help_text,
                    binary_name=binary,
                ),
            }
        ],
    )
    return message.content[0].text

def generate_multi_ui(binary: str, help_tree: dict) -> str:
    """为带有子命令的工具生成标签式UI。"""
    combined_help = ""
    for name, text in help_tree.items():
        label = "Root command" if name == "__root__" else f"Subcommand: {name}"
        combined_help += f"\n{'='*60}\n{label}\n{'='*60}\n{text}\n"

    prompt = GENERATION_PROMPT.replace(
        "Here is the --help output:",
        "This tool has subcommands. Generate a TABBED interface where each subcommand "
        "gets its own tab. Here is the --help output for each:"
    )

    message = client.messages.create(
        model="claude-sonnet-4-20250514",
        max_tokens=12000,
        messages=[
            {
                "role": "user",
                "content": prompt.format(
                    help_text=combined_help,
                    binary_name=binary,
                ),
            }
        ],
    )
    return message.content[0].text

def main():
    parser = argparse.ArgumentParser(description="将任何CLI转换为Web UI")
    parser.add_argument("binary", help="CLI工具的路径或名称")
    parser.add_argument("subcommand", nargs="?", help="特定子命令(可选)")
    parser.add_argument("-o", "--output", default="ui.html", help="输出HTML文件")
    parser.add_argument("--recursive", action="store_true",
                        help="将子命令递归解析为标签式UI")
    parser.add_argument("--deep", action="store_true",
                        help="深度爬取子命令树(最多3层)")
    parser.add_argument("--max-depth", type=int, default=3,
                        help="深度爬取的最大深度(默认: 3)")
    args = parser.parse_args()

    print(f"正在捕获来自: {args.binary} 的--help")

    if args.deep:
        help_tree = deep_crawl_help(args.binary, max_depth=args.max_depth)
        print(f"找到 {len(help_tree) - 1} 个子命令(深度爬取)")
        print("正在生成多标签UI...")
        html = generate_multi_ui(args.binary, help_tree)
    elif args.recursive:
        help_tree = capture_subcommands(args.binary)
        print(f"找到 {len(help_tree) - 1} 个子命令")
        print("正在生成多标签UI...")
        html = generate_multi_ui(args.binary, help_tree)
    else:
        help_text = capture_help(args.binary, args.subcommand)
        print(f"捕获了 {len(help_text)} 个字符的帮助文本")
        print("正在生成UI...")
        html = generate_ui(args.binary, help_text)

    Path(args.output).write_text(html)
    print(f"已写入: {args.output}")
    print(f"在浏览器中打开: file://{Path(args.output).resolve()}")

if __name__ == "__main__":
    main()
就这样。这就是整个工具。
3、让我们在真实工具上运行它
# 简单案例
python cli-ui.py curl -o curl_ui.html

# 带有子命令的工具
python cli-ui.py docker --recursive -o docker_ui.html

# 终极挑战
python cli-ui.py ffmpeg -o ffmpeg_ui.html
4、ffmpeg的惊艳表现
如果你曾经看过ffmpeg的帮助输出,你就知道它对可用性来说是一种战争罪行。数百个标志、嵌套选项和编解码器特定参数。--help输出比一些小说还长。
Claude生成的UI将标志分组为逻辑类别:输入、输出、视频编解码器、音频编解码器、滤镜、格式选项和元数据。每个类别都是可折叠的。布尔标志变成开关。编解码器选择变成下拉菜单,根据选择条件显示编解码器特定选项。
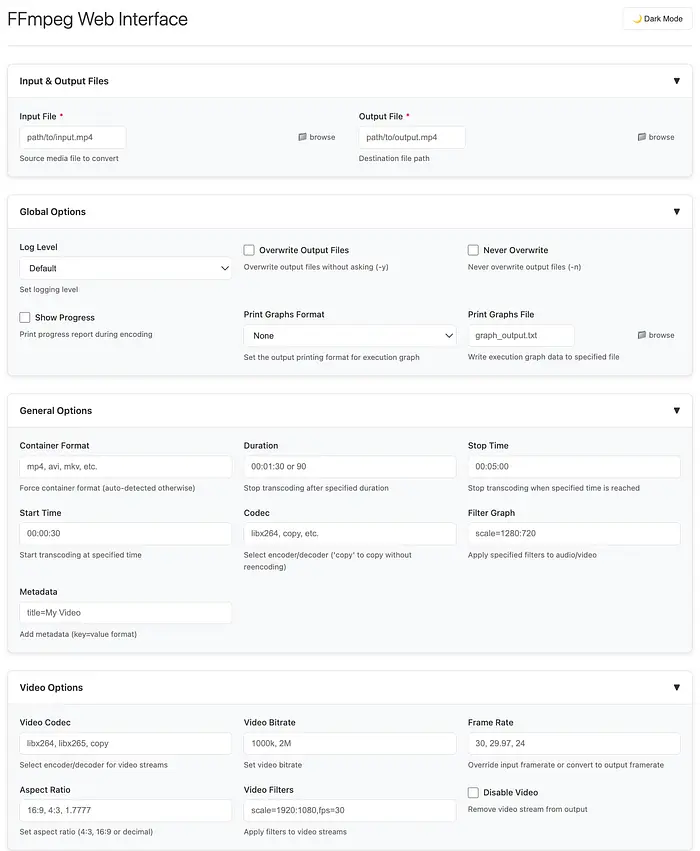
FFMPEG从CLI创建的UI
像kubectl、git和Docker这样的工具没有扁平的标志列表。它们有命令层次结构。kubectl get pods --namespace=X有三层深度。
递归模式通过遍历子命令树来处理这种情况。
5、结果
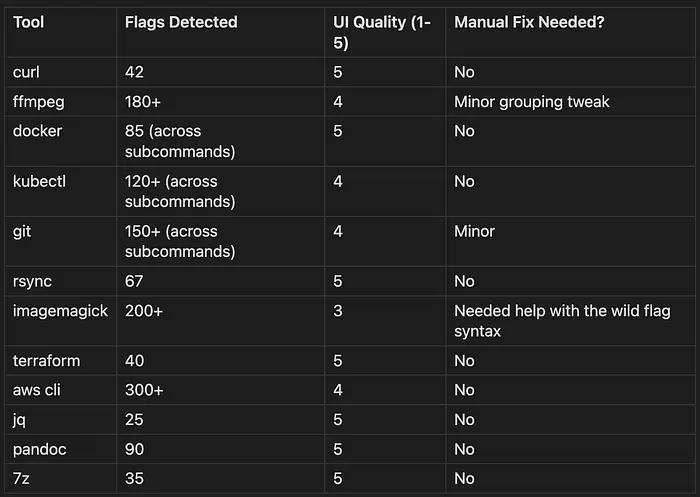
我在一个周末在12个不同的CLI工具上运行了这个:
6、让它真正可执行
生成的UI默认是静态HTML——"执行"按钮不起作用。这里有一个微小的Flask服务器让它活起来:
#!/usr/bin/env python3
"""
cli-ui-server.py — 使生成的CLI UI可执行的微型Flask服务器。
与你的生成HTML一起运行以启用"执行"按钮。

用法: python cli-ui-server.py
然后更新生成的HTML以POST到localhost:5111/execute
"""

from flask import Flask, request, jsonify
from flask_cors import CORS
import subprocess
import shlex
import os

app = Flask(__name__)
CORS(app)  # 允许从file:// URL进行跨域请求

@app.route('/execute', methods=['POST'])
def execute():
    data = request.json
    command = data.get('command', '')

    if not command:
        return jsonify({'error': 'No command provided'}), 400

    try:
        # 为了安全,限制只能执行特定的命令
        allowed_prefixes = ('docker', 'curl', 'git', 'kubectl', 'ffmpeg')
        if not any(command.startswith(prefix) for prefix in allowed_prefixes):
            return jsonify({'error': f'Command not in allowed list: {allowed_prefixes}'}), 403

        # 执行命令
        result = subprocess.run(
            shlex.split(command),
            capture_output=True,
            text=True,
            timeout=60
        )

        return jsonify({
            'stdout': result.stdout,
            'stderr': result.stderr,
            'returncode': result.returncode
        })

    except Exception as e:
        return jsonify({'error': str(e)}), 500

if __name__ == '__main__':
    print("启动CLI UI服务器...")
    print("API端点: http://localhost:5111/execute")
    print("允许从生成的HTML文件的file:// URL访问")
    app.run(host='0.0.0.0', port=5111, debug=False)
7、它为什么有效
这不是魔法。它是有道理的:
- --help文本有结构 — 标志、默认值、类型提示、描述。它已经是一种DSL。
- LLM擅长DSL — 尤其是具有明确语法的结构良好的文本。
- UI是映射 — 输入字段映射到标志。标签映射到描述。验证器映射到约束。
8、边界情况
一些工具是混乱的。这是应对方法:
| 问题 | 解决方案 |
|---|---|
| 非标准--help格式 | 回退到--help 2>&1并解析 |
| 极长帮助文本(ffmpeg) | 在GENERATION_PROMPT中增加max_tokens |
| 深度嵌套的子命令 | 使用--deep模式,限制为3层 |
| 没有子命令检测 | 使用--recursive标志显式爬取 |
9、实际影响
那个花了3天时间的内部工具?10分钟就有了UI。那个我们推迟了6个月的运维脚本,因为没有UI来配置它?现在有了。
帮助文本中的信息已经存在。我们只是终于开始使用它了。
原文链接:Turn Any CLI Into a Web UI — Just Feed It the --help Text
汇智网翻译整理,转载请标明出处